Flashing the NVIDIA Jetson (JetPack 6.x)
Refer to the Datasheets and install the Jetson Orin NX module, wiring and power to the Hadron carrier. Refer the Official Page For the download of the latest official BSP (Board Support Package) and release notes which contains the firmware install instructions.
Note: These steps target Jetson Orin NX/Nano on Connect Tech carriers (Hadron, etc.), Jetson Linux R36.3. Adjust versions as needed. Tested for CT Hadron NGX027 with the Jetpack 6.2.1 - L4T r36.4.4 (BSP Version: ORIN-NX-NANO-36.4.4 V002)
Prerequisities:
- x86/x64 based host machine running Ubuntu 20.04 or 22.04
- JetPack 6.2.1 / L4T 36.4.4 installed (Intstructions follows)
- Orin™ NX or Orin™ NX module
- Connect Tech Orin™ NX/Orin™ NX Carrier
- USB A - USB A Cable for flashing
Install Wifi and SSD
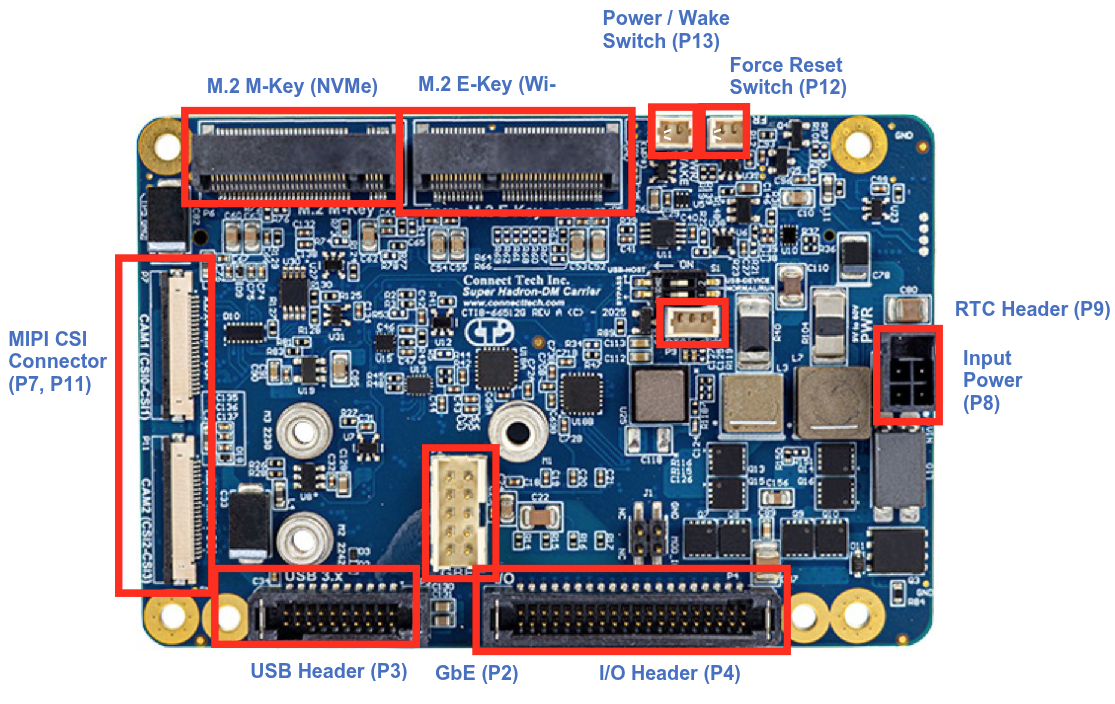
Install the wifi and ssd cards to the PCI mini E and M slots respectively.
Powering up the carrier
The 6S Lipo can be used to power up the board directly. Install a 60V capacitor between the terminals of the main power. Alternatively a AC DC adapter with min 40 W (10-60V) can be used. Get the board ready to be powered up for he flashing of firmware.
What you’ll do
- Prepare a host machine and download JetPack BSP + sample rootfs
- Install the CTI BSP on the host
- Put the Jetson in recovery mode and flash (auto or manual)
- Perform first boot steps and basic post-setup
1) Get JetPack (Driver Package + RootFS)
1) Create a working directory, referred to as BSP_ROOT below.
2) Open the Jetson Linux R36.4.4 downloads and notes:
- Driver page: https://developer.nvidia.com/embedded/jetson-linux-r3644
3) Download both for Orin (LT4):
- Driver Package (BSP): Jetson_Linux_R36.4.4_aarch64.tbz2
- Sample Root Filesystem: Tegra_Linux_Sample-Root-Filesystem_R36.4.4_aarch64.tbz2
4) Place both files under BSP_ROOT, then extract them:
cd <BSP_ROOT>
sudo tar -jxf Jetson_Linux_R36.4.4_aarch64.tbz2
sudo tar -C Linux_for_Tegra/rootfs/ -xjf Tegra_Linux_Sample-Root-Filesystem_R36.4.4_aarch64.tbz2
After extraction, you should have <BSP_ROOT>/Linux_for_Tegra populated.
2) Install the CTI BSP
If you used NVIDIA SDK Manager, BSP_ROOT is typically:
~/nvidia/nvidia_sdk/<JetPack_Version>_Linux_JETSON_NX_ORIN_TARGETS/- or
~/nvidia/nvidia_sdk/<JetPack_Version>_Linux_JETSON_NANO_ORIN_TARGETS/
If you manually downloaded from the Embedded Download Center, use the folder you created as BSP_ROOT.
Download the CTI BSP from CTI BSP Downloads.
For the firmware with real time kernel RT_PREEMPT download the JetPack 6.2.1 – L4T r36.4.4 (RealTime OS) package instead of the base package.
1) Copy the CTI package to Linux_for_Tegra:
cp CTI-L4T-ORIN-NX-NANO-RT-36.4.4-V005.tgz BSP_ROOT/Linux_for_Tegra
2) Extract it and run the installer:
cd <BSP_ROOT>/Linux_for_Tegra
sudo tar -xzf CTI-L4T-ORIN-NX-NANO-RT-36.4.4-V005.tgz
cd CTI-L4T
sudo ./install.sh
cd .. # back to Linux_for_Tegra
The CTI-L4T BSP is now installed on the host, and you can flash Orin NX/Nano.
3) Put the device in Recovery Mode
1) Connect the carrier to your host via USB per the carrier manual. 2) Ensure an NVMe M.2 SSD is installed. 3) Follow the carrier instructions to enter recovery (button/strap sequence).
For NGX027 to put the Jetson module into Force Recovery mode, install a jumper and then power on the platform. After 10 seconds remove the jumper shunt and the device will now be in Force Recovery mode.
Tip: You can verify via lsusb for an NVIDIA device in recovery.
Bus 001 Device 024: ID 0955:7323 NVIDIA Corp. APX
4) Flashing options
You can use either the CTI automated script or the manual NVMe flash script.
Option A: Automated (menu-driven)
cd <BSP_ROOT>/Linux_for_Tegra
sudo ./cti-flash.sh
Follow the menu to select your module and board configuration. Flashing will begin.
Vision Components IMX296camera option for Orin NX is recommended for direct connection to the board. This Lists all the commpatible cameras. This shows how to connect Allied vision cameras using adapter.
Option B: Manual NVMe flash
Do not include the .conf extension in <config>.
cd <BSP_ROOT>/Linux_for_Tegra
sudo ./cti-nvme-flash.sh cti/<module>/<boardname>/<config>
# <module> is one of: orin-nx | orin-nano
Examples:
./cti-nvme-flash.sh cti/orin-nx/boson/base
./cti-nvme-flash.sh cti/orin-nano/boson/base
SUPER_MODE=1 ./cti-nvme-flash.sh cti/orin-nx/hadron/base
When flashing completes, the device will reboot.
Flash is successful
Reboot device
Cleaning up...
Log is saved to
5.1) Troubleshoot Flashing
ISSUE1 : A USB timeout error may occur during flashing. The following error indicates that your flash host’s USB port is not enabled:
[ 0.1172 ] Sending bct_br
[ 0.1603 ] ERROR: might be timeout in USB write.
Error: Return value
1. First try changing the USB port:
-
Move to a different USB port, if available.
-
Remove any USB-C docks if connected
-
Power cycle the board and retry flashing.
2. If that doesn’t work, try disabling autosuspend:
To disable autosuspend on your host’s USB ports, run the following command.
sudo bash -c 'echo -1 > /sys/module/usbcore/parameters/autosuspend'
Power cycle the board and retry flashing.
ISSUE2 : Cnnot mount the NFS server
12:52:45.297 - Error: Flash failure.
12:52:45.300 - Error: Either the device cannot mount the NFS server on the host or a flash command has failed. Check your network setting (VPN, firewall,...) to make sure the device can mount NFS server. Debug log saved to /tmp/tmp.2HZma7rFSi. You can access the target's terminal through "sshpass -p root ssh root@fc00:1:1:0::2"
1. Disable VPN completely
CTI initrd flashing fails 100% if a VPN is on.
2. Restart NFS and RPC services
sudo systemctl stop rpcbind rpcbind.socket nfs-kernel-server
sudo systemctl start rpcbind rpcbind.socket nfs-kernel-server
Check status:
systemctl status nfs-kernel-server
3. Ensure firewall isn’t blocking NFS (especially IPv6)
Temporarily disable ufw (if running):
sudo ufw disable
5) First boot and basic setup
Connect via serial console (recommended)
- Connect to the Serial debug port of the Carrier using a TTL to USB adapter. (ex: FTDI)
- Guide: https://jetsonhacks.com/2019/04/19/jetson-nano-serial-console/
sudo minicom -D /dev/ttyUSB0 -b 115200 - Complete the initial setup prompts. You can skip network here and do it below.
System Configuration
         ┌────┤ License For Customer Use of NVIDIA Software ├─────┐
         │                                                        │
         │ Welcome to Jetson Initial Configuration                │
         │                                                        │
         │                         <Ok>                           │
         │                                                        │
         └────────────────────────────────────────────────────────┘
Join Wi‑Fi via nmcli
sudo nmcli dev wifi rescan
sudo nmcli dev wifi connect <SSID> password <PASSWORD>
SSH in
ssh <user>@<device-ip>
6) Useful post-setup
Setup Git
git config --global user.name "John Doe"
git config --global user.email johndoe@example.com
Increase Swap
You may need to increase swap depending on he RAM of your Jetson module Follow This Guide to upgrade swap memeory.
free -h # Check current memory usage
df -h # Check current disk usage

# start from here to increase swap size to 16G
sudo fallocate -l 16G /swapfile # Allocate 16G of space for swap file
ls -lh /swapfile # Verify the swap file is created
sudo chmod 600 /swapfile # Set the correct permissions for the swap file
sudo mkswap /swapfile
sudo swapon /swapfile
free -h # Check current memory usage

# to make the change persistent across reboots, add the swap file to /etc/fstab:
sudo cp /etc/fstab /etc/fstab.bak
echo '/swapfile none swap sw 0 0' | sudo tee -a /etc/fstab
Install Jetpack extras and Jtop
sudo apt install nvidia-jetpack

# Setup jtop
sudo apt update && sudo apt upgrade -y
sudo apt install python3-pip -y && sudo apt install curl -y
sudo pip3 install -U jetson-stats
mkdir hacks && cd hacks
git clone https://github.com/jetsonhacks/jetson-jtop-patch.git
cd jetson-jtop-patch
chmod +x apply_jtop_fix.sh
./apply_jtop_fix.sh
Once pip installs the jetson-stats package, you will need to logout/login or reboot the Jetson.
After rebooting, to run jtop open a Terminal and execute: jtop
NoMachine (remote desktop)
To setup remote desktop to the headless system for debugging follow this guide
wget https://web9001.nomachine.com/download/9.4/Arm/nomachine_9.4.14_1_arm64.deb
sudo dpkg -i nomachine_9.4.14_1_arm64.deb
sudo systemctl disable gdm3 --now
sudo /usr/NX/bin/nxserver --restart
Change power mode
sudo nvpmodel -m <mode-number>
- Reference: https://forums.developer.nvidia.com/t/power-mode-in-terminal/287224
Install VSCode
cd hacks
git clone https://github.com/JetsonHacksNano/installVSCode.git
cd installVSCode
./installVSCodeWithPython.sh
Cuda and cudnn
If cuda packages are not installed. ls /usr/local | grep cuda returns nothing
sudo apt install cuda-toolkit-12-6
if cudnn not installed. dpkg -l | grep cudnn returns nothing, Get Cudnn
wget https://developer.download.nvidia.com/compute/cudnn/9.16.0/local_installers/cudnn-local-tegra-repo-ubuntu2204-9.16.0_1.0-1_arm64.deb
sudo dpkg -i cudnn-local-tegra-repo-ubuntu2204-9.16.0_1.0-1_arm64.deb
sudo cp /var/cudnn-local-tegra-repo-ubuntu2204-9.16.0/cudnn-*-keyring.gpg /usr/share/keyrings/
sudo apt-get update
sudo apt-get -y install cudnn9-cuda-12
Setup .bashrc
Add following lines to your .bashrc to link important cuda libraries
export CUDA=12.6
export PATH=/usr/local/cuda-$CUDA/bin${PATH:+:${PATH}}
export CUDA_PATH=/usr/local/cuda-$CUDA
export CUDA_HOME=/usr/local/cuda-$CUDA
export LIBRARY_PATH=$CUDA_HOME/lib64:$LIBRARY_PATH
export LD_LIBRARY_PATH=/usr/local/cuda-$CUDA/lib64${LD_LIBRARY_PATH:+:${LD_LIBRARY_PATH}}
export LD_LIBRARY_PATH=/usr/local/cuda/extras/CUPTI/lib64:$LD_LIBRARY_PATH
export NVCC=/usr/local/cuda-$CUDA/bin/nvcc
export CFLAGS="-I$CUDA_HOME/include $CFLAGS"
export LD_LIBRARY_PATH=/usr/local/cuda-$CUDA/targets/aarch64-linux/lib:$LD_LIBRARY_PATH
export CPATH=/usr/local/cuda-$CUDA/targets/aarch64-linux/include:$CPATH
Source your .bshrc
Verify Cuda and CUDNN
echo '#include <cuda_runtime.h>
#include <cudnn.h>
#include <iostream>
int main() {
    int cudaVersion;
    cudaRuntimeGetVersion(&cudaVersion);
    std::cout << "CUDA runtime version: " << cudaVersion/1000 << "." << (cudaVersion%1000)/10 << std::endl;
    std::cout << "cuDNN version: " << CUDNN_MAJOR << "." << CUDNN_MINOR << "." << CUDNN_PATCHLEVEL << std::endl;
    return 0;
}' > verify_cuda_cudnn.cpp && \
g++ verify_cuda_cudnn.cpp \
    -I/usr/local/cuda-12.6/targets/aarch64-linux/include \
    -L/usr/local/cuda-12.6/targets/aarch64-linux/lib \
    -lcudart -lcudnn -o verify_cuda_cudnn && \
./verify_cuda_cudnn
Fix Snap apps
If Snap apps like Chromium is not working, ref
snap download snapd --revision=24724
sudo snap ack snapd_24724.assert
sudo snap install snapd_24724.snap
sudo snap refresh --hold snapd
Mount a USB drive
- https://linuxconfig.org/howto-mount-usb-drive-in-linux
Wezterm and Superfile
Install wezterm
curl -fsSL https://apt.fury.io/wez/gpg.key | sudo gpg --yes --dearmor -o /usr/share/keyrings/wezterm-fury.gpg
echo 'deb [signed-by=/usr/share/keyrings/wezterm-fury.gpg] https://apt.fury.io/wez/ * *' | sudo tee /etc/apt/sources.list.d/wezterm.list
sudo chmod 644 /usr/share/keyrings/wezterm-fury.gpg

sudo apt update

sudo apt install wezterm

sudo update-alternatives --config x-terminal-emulator # set to wezterm
Install Superfile
bash -c "$(curl -sLo- https://superfile.dev/install.sh)"
References
1) Hadron carrier: https://connecttech.com/product/hadron-carrier-for-nvidia-jetson-orin-nx/ 2) CTI L4T release notes (36.3.0): https://connecttech.com/ftp/Drivers/L4T-Release-Notes/Jetson-Orin-NX-Orin-Nano/ORIN-NX-NANO-36.3.0.pdf 3) CTI knowledge base: https://connecttech.com/resource-center/kdb373/ 4) torchvision dev install: https://github.com/pytorch/vision/blob/main/CONTRIBUTING.md#development-installation
Continue
- ← Back: Hardware Assembly
- Next → Software Setup